In this article, we have covered easy steps on how to How to Disable HP Support Assistant.
For Windows users, the updates are both a boon and a headache. And for users of HP, the regular updates are a definitely a headache. The Support Assistant provided by HP is a great tool which acts as a one-stop solution for all your maintenance problems of your PC. While this facility is great, many times this becomes a headache as we do not want to spend our precious time trouble shooting maintenance problems in our PC. In this case you can easily disable HP Support Assistant.

Here’s the easy set of steps on how to disable HP Support Assistant.
How To Disable HP Support Assistant
Step 1 – Launch the HP Support Assistant icon on your desktop by double clicking on it.
Step 2 – Click on “Settings” which appears in the bottom left corner of the window.
Step 3 – Go to “Health Analysis” tab.
Step 4 – On the drop down menu, click ‘Frequency’ and select ‘Never‘.
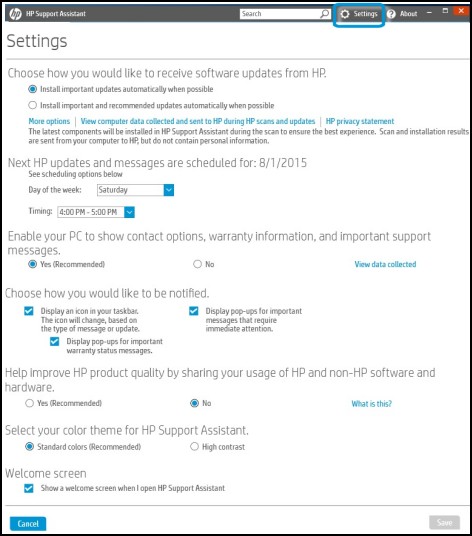
Step 5 -Then go to ‘How would you like to receive software updates and messages from HP?‘ and select the drop down menu under it.
Step 6 – Select “Never check for updates or messages (Not recommended)” from the options.
Step 7 – Go to ‘Change tune-up schedule‘ and select ‘Never’ from the drop down menu under it.
Step 8 – Click ‘Save‘.
By this, you can easily disable HP Support Assistant and hence save your time from frequent interruptions.
How To Disable HP Support Assistant Using Task Scheduler

Step 1 – Press ‘Windows + X‘ together on your keyboard to open power user menu.
Step 2 – Select ‘Control Panel‘.
Step 3 – Click the option ‘System and Security‘.
Step 4 – Go to ‘Administrative Tools‘ menu.
Step 5 – Click ‘Schedule Tasks‘.
Step 6 – Click ‘Task Scheduler Library’.
Step 7 – Select ‘Hewlett-Packard‘ and ‘HP Support Assistant’.
Step 8 – Right-click on HP Support Assistant and Update Check.
Step 9 – Select ‘Disable‘.
How To Uninstall HP Support Assistant
Step 1 – Press Windows + X keys together on the keyboard to open the power user menu.
Step 2 – Select Control Panel.
Step 3 – Under “Programs” heading, select ‘Uninstall a program‘.
Step 4 – Select ‘HP Support Assistant‘ from the list.
Step 5 – Click ‘Uninstall‘.
Step 6 – To uninstall HP Support Assistant, follow the instructions thereafter.
You can uninstall HP Support Assistant, but it is advisable to not uninstall it. You can simply disable HP support assistant to avoid the interruptions. Installing such an important program provided by the system itself might cause difficulties in the future.
Though this feature is supposed to be for quick-fixes for purpose of maintenance of HP laptops, this feature is found to be bugging in nature by many. The frequent messages and notifications are found to be bothersome. Hence it is natural to look for options on how to disable HP Support Assistant.
For more tips and tricks related to tech and other things, check out our website TricksMaze.


