

Do you want to reinstall your Network and WiFi drivers on Windows 10 operating system? Are you able to connect to your WiFi access point properly? Facing disconnections again and again? Then this tutorial is for you. In this guide we will show you how to Reinstall WiFi drivers on windows 10 OS, not only the WiFi Drivers, we also show you how you can uninstall and reinstall all your Network Adapters drivers.
If you are facing wireless connectivity issue in your Windows then it is really a good option to uninstall your driver and reinstall the drivers but before getting into that process we should also check that all software drivers which are currently installed in our Windows OS are up to date or not. We should also check that our Windows is updated to the latest version and if still, that doesn’t work then we have to manually update the Network and WiFi drivers from Disk Management. After doing this process if you are still facing the same issue then we have to manually uninstall the Drivers and Reinstall it. Let see how can we do it.
How to Reinstall WiFi Drivers on Windows 10/8/7
So here we going to mention two steps for you. All you have to do is, follow them step by step and all your WiFi connectivity problem will be solved in seconds, so let’s start without wasting up more time.
Step 1: Uninstall Wireless Network Adapter in Device Manager
Go to Desktop and press Windows + X button right from your keyboard and select Device Manager. It will ask you permission on the prompt. You just have to click on Yes button.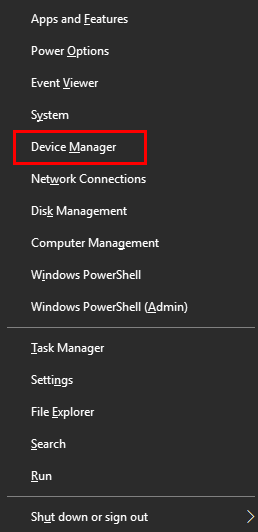
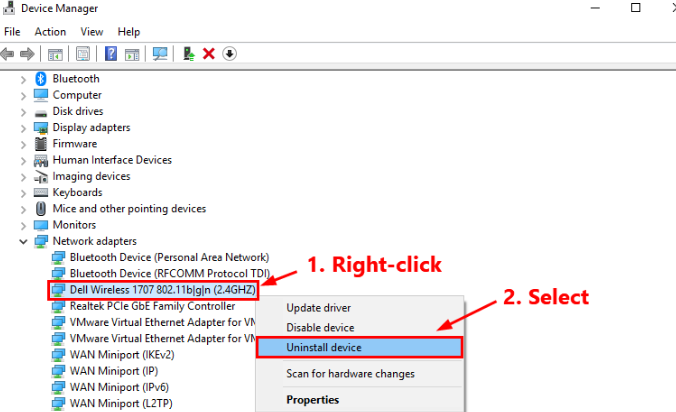
In Device Manager, you have to find Network Adapters section and inside that, you will find your WiFi Driver, you have to right-click on that and select Uninstall device option and it will start uninstalling the driver from your system.
Note: If you are facing the same connectivity problem with other Ethernet and Bluetooth devices, then you have to repeat the same steps for them.
Step 2: Reinstall the WiFi drivers
Open Device Manager and on the top of the menu you will find Action option, click on that and it will open sub-menu.
Here you have to select Scan for hardware changes. It will start scanning for the missing drivers and when it finds the WiFi driver is missing, it will automatically start downloading and installing it in your system.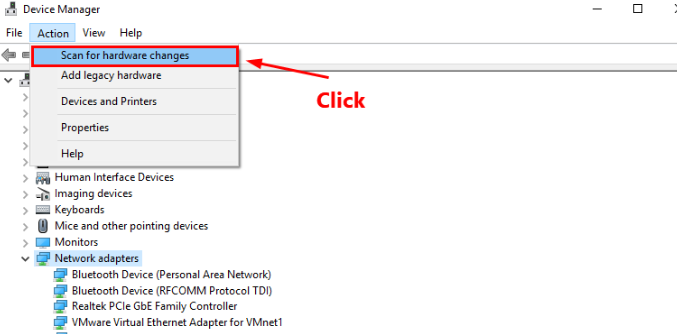
Once the installation is done, again you have to open Device manager and inside Network adapters section you will find that, your WiFi drivers will reappear.
It means the WiFi driver is reinstalled successfully, Now just simply restart your system to make sure all the changes which are done currently are properly saved and committed. 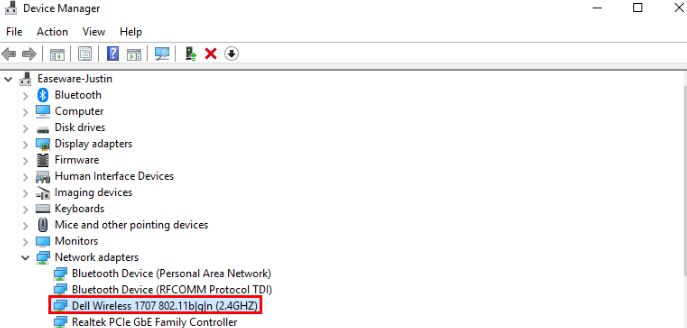
Do Also Read: WiFi Keeps Disconnecting or Dropping
That’s it. This was all about How to Reinstall WiFi drivers on Windows 10 operating system. It doesn’t matter if you are using Windows 10 or 8 or 7, this tutorial will help you anyway because the process is the same for all the version. You just need to make sure that all the driver software and your Windows OS is updated to latest version else there some program which doesn’t work properly if your OS is not updated. If you face any problem then please let us know in the comment section below and we will surely help you get rid of this annoying problem.