

You all must be aware of the Fast user switching, a useful feature that comes with Windows. As the name suggests, fast user switching allows one to switch between different accounts on the machine or device you using quickly. Fast users switching is although very handy feature from Windows but at the same time if not used properly can lead to problems as it has its downsides. It makes your machine run slowly because so many programs are running at the same time. As said due to this issue many of you will want to disable fast user switching windows 10 and also log off their accounts before any other person can log in. So when you disable fast user switching only those programs run that are currently being logged in. On the other hand if one wants to use a single device for all the accounts at the same time and want no interruption from other users enabling of fast user switching is also a great idea. Well. In this guide, I will tell how to enable fast user switching and also disable fast user switching. One can turn fast user switching on or off anytime they want with just a few simple steps according to their need.
What is Fast User Switching?
To be precise fast user switching allows users to sign into their computer while other users are also signed in using the same device. No doubt it has its advantage that lets you sign in to the account without asking other users to log off their accounts thus simultaneously allowing many users to log in at the same time. But like it is aid every coin has two sides similarly fast user switching also has its disadvantages.
Fix WMI Provider Host Error in Windows 10
How to disable Fast User Switching?
To turn Fast User switching on or off basically two methods are employed. Both of the methods allow you to disable fast user switching so just follow the given steps as mentioned to enable or disable switching off accounts between different users-
Method 1- Enable/Disable Fast User Switching in Group Policy-
This is one of the most widely accepted and used methods to disable fast user switching Windows 7 that applies to almost all versions of Windows XP, Vista, 8 or 10. For Windows 10 users this is the easiest way to enable or disable fast user switching windows 10 as local group policy editor is a very powerful tool which is worth using and spending your time if you haven’t used it ever before.
Step 1- Press Win+R to open the Run dialog box. Type the command as “gpedit.msc.”
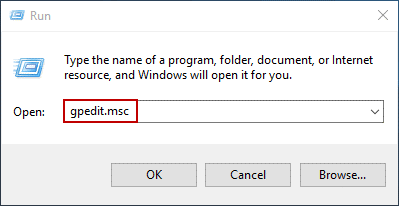
Step 2- Then press Enter. This will open Local Group Policy Editor.
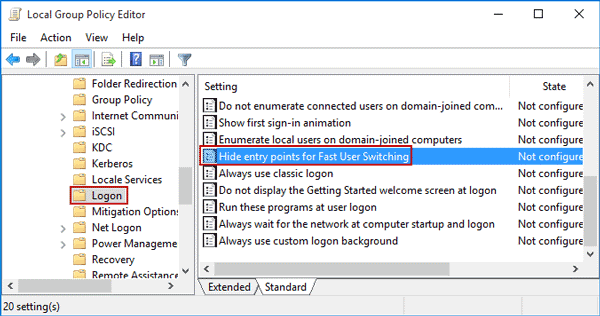
Step 3- First expand the left pane and choose Computer Configuration > Administrative Templates > System > Logon Then in the right side panel double click to open “Hide entry points for Fast users switching.”
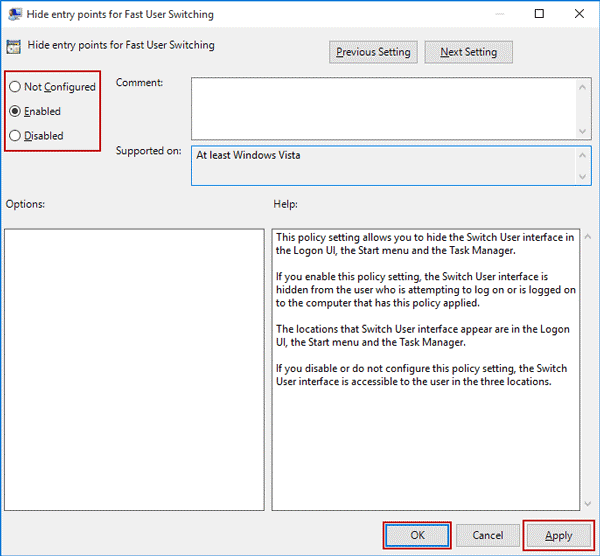
Step 4- Then check in the box the option of enable or disable/not configured in the pop-up dialog box that appears. Then click on apply changes to save your option for fast user switching.
Step 5- Now exit the Local Group Policy Editor. Now you can sign off your account and then sign in again to verify whether your applied changes were successful or not.
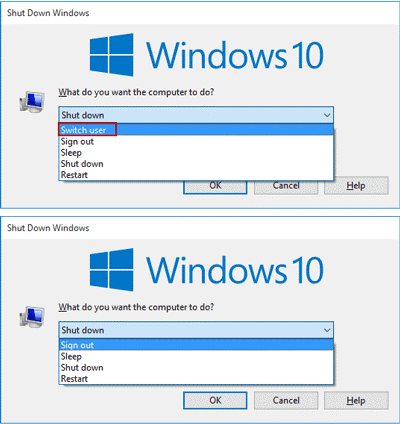
In case you disable fast user switching feature of Windows 10 then the Switch user option will be grayed out from your Windows logo screen Start menu option and also from task manager.
Method 2- Disable Fast User switching by editing the Registry-
Another useful method that Windows users can try to disable fast user switching feature is to make some editing in the Windows Registry. For Windows Pro or Enterprise users local group editor policy may be more useful but else the method of the registry is also equivalent while making changes. Registry editor is again a powerful tool and must be used very carefully for misusing it can make your system unstable or even stop its function. But you do not worry as it is a very simple hack to try, so get started with the below-mentioned steps-
Step 1- To open the Run dialog box press Win+R key. Then type “regedit” and hit enter.
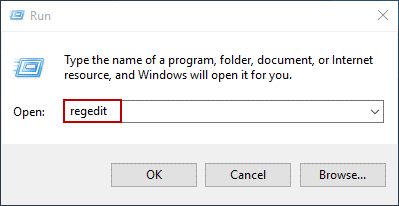
Step 2- After when you press the enter button the Registry editor windows will open.
Step 3-From the Registry window navigate through the following ink given below-
HKEY_LOCAL_MACHINE\SOFTWARE\Microsoft\Windows\CurrentVersion\Policies\System
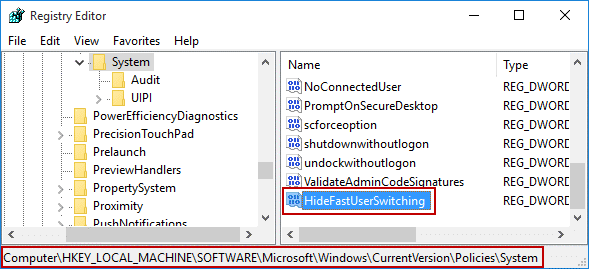
Step 4- Then from the right side of the pane search for the name as Hide Fast User Switching. If in case you cannot find this option or it does not exist then right-click on the empty space on the right pane. Then choose New –> DWORD (32-bit) Value.
Step 5-In the next step, you will have to choose the value to enable or disable fast user switching option to change the value for enabling or disabling.
Step 6- Double click on the value or enter the value between 0 and 1. If you want to disable the Fast User Switching feature, then set the value data for HideFastUserSwitching to 1. And if you wish to re-enable the FastUserSwitching then change that value to 0.
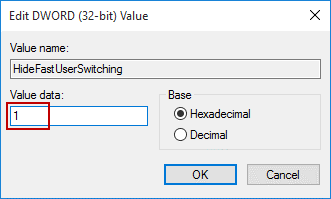
Step 7- Click OK to make your changes.
Step 8- Now finally close the Registry editor window and log off your account. Then log in back to make the changes take place.
Once you have followed these steps successfully then when you will try to press Alt+F4 to switch user in Windows 10 or if you click on the log in the user account to switch to another account this option of Fast User Switching is enabled or disabled will be shown.
Just remember that when you use the above-mentioned hacks, it technically does not disable fast user switching but hides all the available switch users’ interfaces that occur on the Start menu of your Windows icon, Task manager and from the sign in screen. Once after disabling the fast user switch feature when all users will sign out of the account, they will no longer be able to switch over between different accounts using the Windows interface. Well, I hope you will find these methods useful and easy to follow to enable or disable fast user switching to keep yourself safe.