


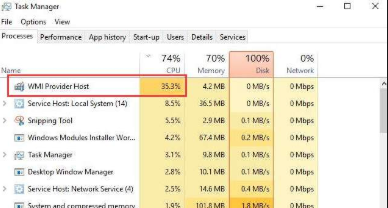
You may have seen that WMI Provider Host is hoarding your PC CPU use. At the point when the CPU utilization in Task Manager shoots up, your PC backs off. Numerous Windows 10 clients are revealing this issue; you’re not the only one. Irritating as it appears, you can fix the high CPU utilization issue without anyone else.
Developers often need constant feedback on how their software can be improved and make a difference after their application is out. Windows developers often use the WMI provider host. It’s a host management process that tracks the various activities of the newly launched software for developing and monitoring purposes.
Often this type of behavior is carried out when an electronic device has been upgraded from windows 7 to windows 10. Thus, when the upgrade has been carried out, you can notice that the usage of the overall CPU spikes up drastically. Thus, making the system irresponsive, laggy, and hot on the touch. In turn, making the whole experience slow and frustrating.
Editor’s recommendation:
The primary reason for this type of behavior after its upgraded is that an unusual behavior forms the process that makes the system irresponsive and cayuses the system to malfunction several times because of the extreme heat and overload of the CPU.
Fix WMI Provider Host Error in Windows 10
In this guide we are going to show you a few methods on you can solve WMI provider host error. You the first method works for you then you don’t have to follow all other methods but if it doesn’t then you should go through the rest other solutions too. So let’s start without wasting up more time.
1: Run a Virus Scan
From time to time, the wrong-doer is contamination or malware. You essentially need to run your antivirus program to get it settled. If you haven’t done it yet, you should do it right now.
Taking into account that your PC distinguishes any unwanted ventures or applications, oust them absolutely from your PC and restart a while later.
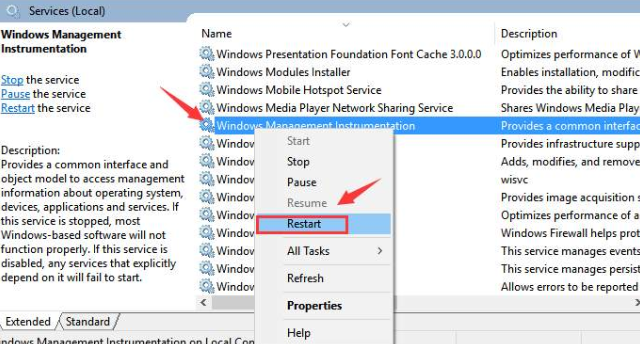
2: Try to Restart WMI Provider Host Service
Sometimes, the issue is with WMI Provider Host Service possessing excessively of your PC assets. You can
restart it:
Step 1: On your console, press the Windows logo key and ‘R’ and type in the pursuit box ‘services.msc’ and press ‘Enter’.
Step 2: Press ‘W’ key to quick find Windows Management Instrument benefit. Right-click it and select ‘Restart’.
Step 3: Now click Windows key and ‘X’ and select Command Prompt (Admin).
Step 4: In the Command Prompt window, type in the accompanying directions and press ‘Enter’ after each order.
Step 5: Restart your PC after the directions.
3: Uninstall software and components which are creating the problem
One of the causes is flawed segments and equipment drivers. You may need to uninstall them from your PC:
Step 1: On your console, press the Windows logo key and ‘X’ and select Event Viewer.
Step 2: Click the ‘View’ option to finish everything and after that ‘Show Analytic and Debug Logs’.
Step 3: On the left sheet, go to ‘Applications and Service Logs > Microsoft > Windows > WMI Activity & Operational log’. Discount the things recorded as Error.
Step 4: On your console, press the Windows logo key and ‘X’ and select ‘Task Manager’.
Step 5: Go to Services tab. Search for the procedures with coordinating IDs as found in Event Viewer in PID
segment.
When you find such a process, you can uninstall the program or impair its administration as you like. It’s imperative that you download and introduce projects and drivers just from trust-commendable sources.
4: Repairing the corrupt files
There are plenty of software’s that you can download and fix the issue. But the best that you can choose is Reimage Plus. Download the software and run a scan to check the files that are missing or corrupt and repair it automatically. If the CPU load drops after the scan, then the problem is solved, if not, follow the other steps enlisted below. Another software that you can download is driver easy. Provides the same functionality as the software mentioned previously.
5: Restart other associated services
- Step1 – once you have completed the above-given steps, then the next steps are quite straightforward. Hover the mouse to the “windows logo” at the bottom left corner after which right-click on it and choose the “command prompt(admin)” option. It might be different for different PC’s, but choose the command prompt option and run it as “administrator.”
- Step2 – once you have command prompt opened up and running as administrator, the below-given commands have to be typed one by one. After one set of code entered, press the enter button.
net stop iphlpsvc
net stop wscsvc
net stop Winmgmt
net start Winmgmt
net start wscsvc
net start iphlpsvc
- Step3 – once you have entered all the commands correctly, reboot your PC and recheck the control panel. There should be some significant drop in the overall usage of the CPU and bring it back to normal usage. If the problem persists, then try out the below solutions.
6: Carrying out a clean reboot of the PC to clean out faulty applications
In a clean boot, only the applications that are necessary to restart the system are activated. Rest all of the applications are stopped form initiation. Thus, it helps the PC to start seamlessly without any excessive load or usage of CPU. To perform a clean boot, follow the below-given steps.
- Step1 – run your computer from an administrator account.
- Step2 – run command prompt by pressing the windows button + “R” button.
- Step3 – enter “msconfig” in the space provided and click on “ok.”
- Step4 – from the dialogue box, click on “services” and then on “hide all Microsoft services.”
- Step5 – Click on “disable all” and later on “ok” present below.
- Step6 – after which from the option available above, click the “startup” options and then click on “open task manager” option.
- Step7 – ensure that you disable all the application that has an enabled status on them.
- Step8 – restart the system and check if the problem is resolved. If the issue is solved, then it should have been a third-party application causing the problem. Keep then disabled and if it’s causing a problem after disabling the application, use an alternative application.
Thus, the above-given methods will help in clearing out the persisting problem at hand. If it persists, then it’s a better option to contact the customer care executives to assist you further in the overall eradication of the problem at hand.