

Windows 10 provides its users to deal with a lot of useful and unusual features. But Microsoft is the master that plans, builds and delivers the features that Windows 10 as an Operating system offers. The compatibility service is one of them. It is a feature which gets enabled by default in every Microsoft device which collects information on the user activity and then delivers it to Microsoft. The idea behind this feature is innocent, but many times it causes a lot of trouble like Microsoft high disk usage issue and privacy issues as well. So in such case Microsoft compatibility telemetry, i.e., compattelrunner.exe needs to be disabled. There are few methods through which we can disable Microsoft compatibility Windows 10, but before going into it let us know a little about what is Microsoft compatibility telemetry.
What is Windows 10 Microsoft Compatibility Telemetry?
Windows compatibility telemetry is relevant technical data from the Windows devices that tell how the device is performing and covers all information about the device and the related software. Microsoft gathers all the information from the computers, combines it and then uses the data to improve its services along with Windows service and enhance the user experience and to keep Windows secure. Its functions include-
- Keeps the Windows secure, performant and reliable
- Keeps Windows updated
- Allows to personalize engagement surfaces of Windows
- Analyzes the use of Windows and helps in its improvement
Microsoft compatibility Telemetry should not be confused with functional data and so to understand this better have a look at a few examples that are called telemetry data. The type of hardware used, the usage details of the applications installed and the types of applications installed, along with the reliability information on the device drivers all come under Microsoft compatibility telemetry.
Levels of Telemetry
As we now know what Microsoft Compatibility Telemetry is, let us know a little more about the levels of telemetry in Windows 10. There is a total of 4 levels of telemetry, the first being “Security,” the second one is “Basic,” the third telemetry level is “Enhanced, ” and the last one is “Full.”
Security- In this level, the telemetry data collected is required to keep the Windows device secure. This telemetry data gets stored and available in the Windows 10 Enterprise, Windows IoT Core, Windows 10 Education editions only.
Basic- In this level, you will find only a minimum set of data that is required to understand the device and to identify its problems. The telemetry data available at this level is always minimum.
Enhanced- In the next level, telemetry data gathered tells about how the user uses Windows and its apps. Also, the Microsoft compatibility telemetry data at this level helps Microsoft with improvement for user experience.
Full- The last level as the name suggests gathers complete information, i.e., data from all the above levels. Also, it collects any additional data required for the identification and fixing of problems.
How to Fix Microsoft Compatibility Telemetry Windows 10?
Windows compatibility telemetry or the compattelrunner.exe file uses a lot of disk processing resources and leads to high CPU usage. Also, it transfers the telemetry information and so if you intend to terminate Microsoft telemetry Windows 10, then you can use any of the below-given methods.
Method 1- Using Command Prompt
You can disable the Microsoft Compatibility Telemetry Windows 10 by using the Command Prompt method. In this process, you need to type the commands in the CMD window and press enter after every command.
Step 1: Press the Windows icon button +R to open the Run window. Type “cmd” and press Enter
Step 2: Now in the Command Prompt window, right-click on it and select Run as administrator option.
Step 3: Enter the following commands and then press Enter after every command.
- sc delete DiagTrack
- sc delete dmwappushservice
- echo ““ > C:\ProgramData\Microsoft\Diagnosis\ETLLogs\AutoLogger\AutoLogger-DiagTrack-Listener.etl
- red add “HKLM\SOFTWARE\Policies\\Microsoft\Windows\DataCollection”/v AllowTelemtery/t REG_DWORD/d 0 /f
You have to enter these commands one by one and press Enter after each one.
Method 2 – Using Registry Editor
You can also use the Registry Editor method to disable the Compatibility Telemetry Windows 10 if you are an individual user working from home and the Windows 10 version running on your PC or laptop doesn’t ship with the Group Policy Editor. Follow the given steps:
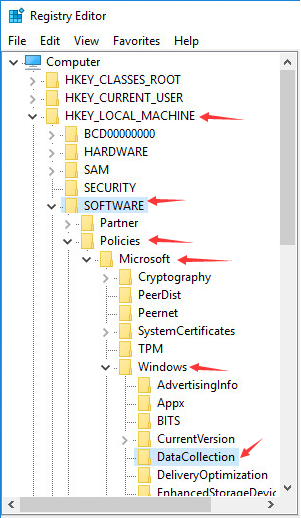
Step 1: Open the Registry Editor by typing regedit in the Run window.
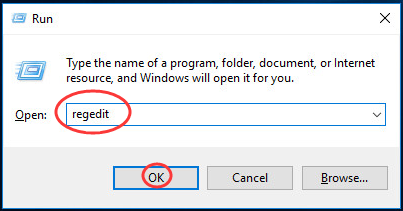
Step 2: Now you need to navigate to the below-given key.
HKEY_LOCAL_MACHINE\SOFTWARE\Policies\Microsoft\Windows\Data Collection
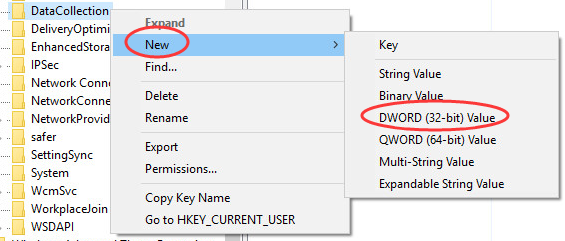
Step 3: In this section, you need to create a new DWORD of 32-bit and name it as AllowTelemetry and then assign it a 0 value. Completing this step will disable Telemetry. But if there is no key, then you will have to create one.

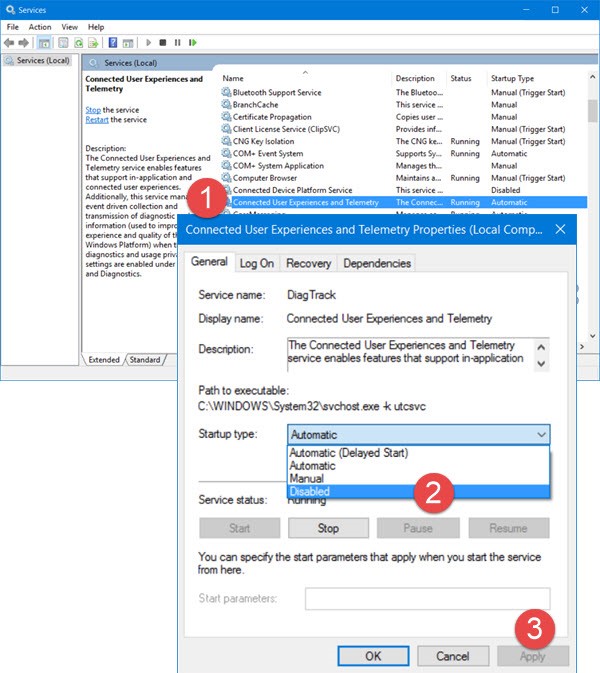
Step 4: Next you also need to disable the Connected User Experience and Telemetry Service.
Step 5: To perform step no. 3, run services.msc from the run window and then locate the above-given option.
Step 6: Double click on the “Connected User Experience and Telemetry Service” and select disable from the Startup type option.
The services of Connected User Experience and Telemetry have features that enable the Connected User experiences and in applications. Alternatively, you can also disable Windows 10 telemetry by using Windows PowerShell. And follow the given commands in a sequence.
- stop-service diagtrack
- set-service diagtrack –startuptype disabled
Method 3 – Through Diagnostics Tracking Service
The Windows compatibility telemetry as we know works to improve the user experience with Microsoft if you wish you can close this feature and are free not to participate in any feedback process. By disabling the automatic feedback, you can step down from the operation of improving the operating system. Follow the given steps, to disable Microsoft compatibility telemetry Windows 10.
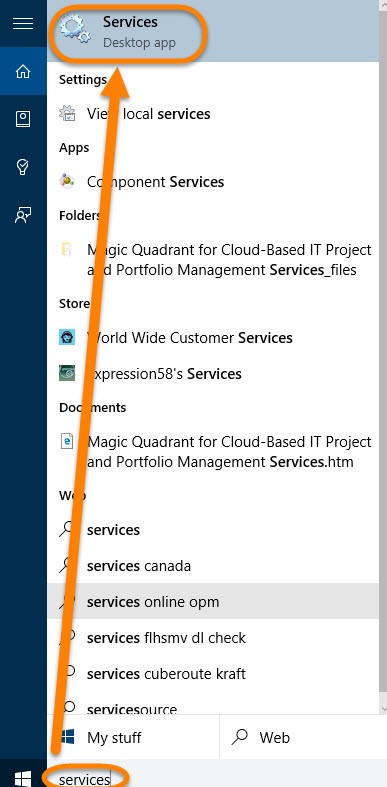
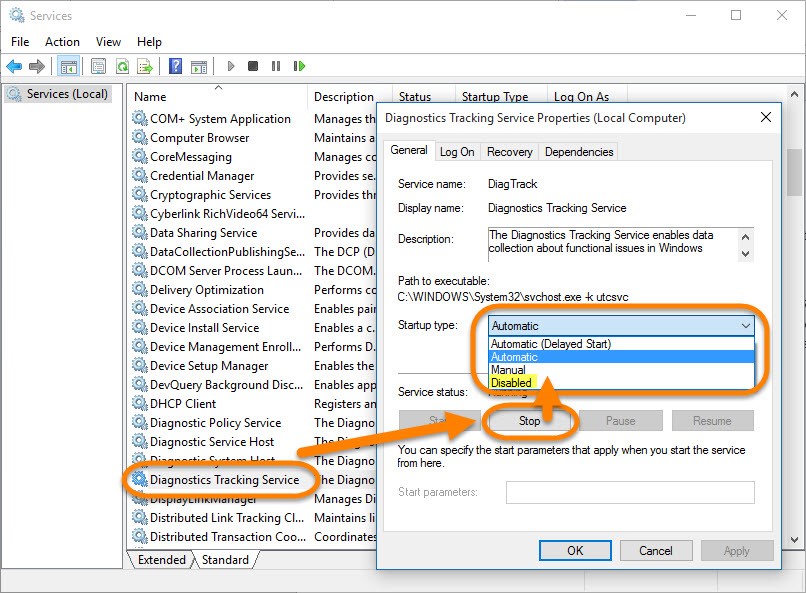
Step 1: Firstly you need to run the Services, a desktop app.
Step 2: Now in the services list, look for Diagnostics Tracking Service. Open the Property Sheet of the same.
Step 3: Now in the Property window, click on the General tab, and select Disable within the Startup Type.
Since we are discussing Microsoft compatibility telemetry Windows 10, then you must know that a GPO is provided by the Microsoft to turn this service off. Check out the next method to find out more about it.
Method 4 – Through Group Policy Editor
If you are facing Microsoft telemetry high disk usage problem, then you can overcome it be disabling the compatelrunner.exe Microsoft compatibility telemetry service. The Group Policy Editor method will work as a quick fix for the users who are recently facing the Microsoft compatibility high disk usage by the CPU.
Step 1: Press the Windows icon key +R to invoke the run command.
Step 2: In the Run window, type gpedit.msc and enter OK.

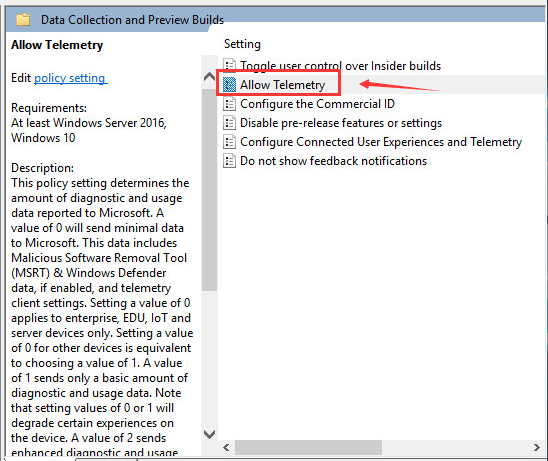
Step 3: The Local Group Policy Editor window will open. Here within Computer Configuration, click on Administrative Templates. Within Administrative Templates, locate Windows Components and click on it. And then click on the Data Collection and Preview Builds option. To be precise, follow the given route-Computer Configuration> Administrative Templates> Windows components> Data Collection and Preview Builds

Step 4: Now double click on “Allow Telemetry.”
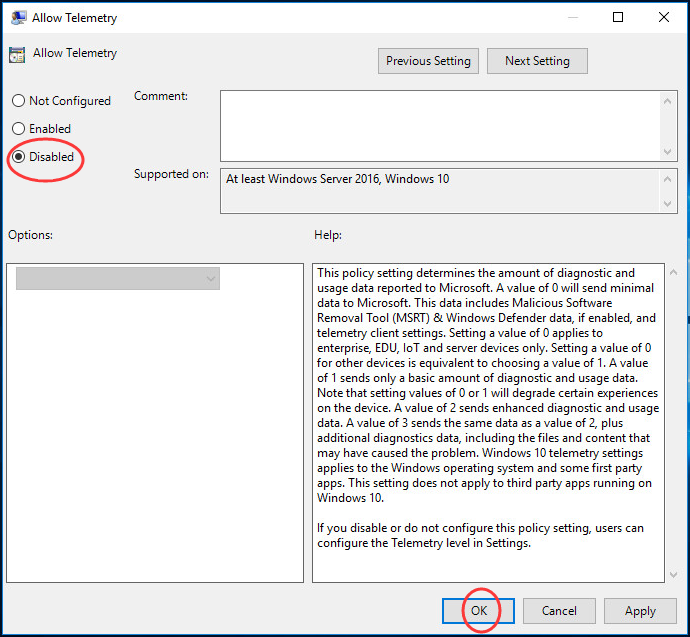
Step 5: Click on disabled option and press OK.
Method 5 – Remove it From the Task Scheduler
The compattelrunner.exe Microsoft compatibility telemetry issue is not infamous among Windows 10 users, and so one can put a stop on the malware like the behavior of the compattelrunner.exe file. The users have complained about high disk usage in turn heating issues. So to combat the problem, you can just remove the file from the Task Scheduler.
Step 1: Open Task Scheduler and follow the given router.
Task Scheduler Library> Microsoft> Windows> Application Experience
Step 2: In the folder that opens, disable all the three tasks displayed.
Step 3: No open the Task Scheduler Library and then click on Microsoft> Windows> Customer Experience Improvement Program
Step 4: In this section also you need to disable all the three options given.
This method applies to all versions of Windows including Windows 10. You can try the above methods, but if nothing works, then it is advised to use the Reimage Plus tool. It is a recommended tool for every PC problem as there is always a probability of hackers hiding their malware under legitimate files.
Reimage Plus-
The Reimage Plus will not only help you with the computer errors, and protect your data from getting lost, hardware failures and malware but will also work to optimize the performance of your PC. With Reimage Plus you can fix any issue.
Step 1: Download Reimage Plus from its official website.
Step 2: Tap on “Start Scan” to identify the Windows issue that is causing problems.
Step 3: To fix the issues that are causing your PC to run slow, you can click on “Repair All” to fix all problems at once.
The built-in feature of telemetry was sought to bring about an improvement in the features and experience between the user and the operating system. But sometimes features like this might become interfering and so you have an option to minimize your connection with Microsoft through your operating system, Windows 10 by disabling the compattelrunner.exe Windows 10 service. All the above method are compatible with Windows 10, and so you can apply any of them to prevent your data from being shared.